Saturday, October 24, 2015

Upfront Costs During the Buying Process

You've gotten pre-approved with a wonderful mortgage lender, started working with your fantastic Realtor®, and have found The One!  Now What?

People have probably told you "how expensive buying a home is" or something along the lines of "how much of a hassle it can be."  Truth is, buying a home can be stressful, but it doesn't have to be a bad experience.  You just need to be prepared!


Once you have found The One and have a binding agreement, there are some upfront costs that you will have to pay for before you get to the closing table.

  • Earnest/Trust Money - Think of this as the deposit to your contract.  Your trust money is showing that you are a serious buyer and you are not going all over your county submitting offers on different homes.  Depending on the price range you are buying in, the amount of trust money required can fluctuate, but generally starts around $500.

  • Appraisal Fee - Your mortgage lender will have to order an appraisal to make sure your new home is worth the money you are borrowing to purchase it.  The loan program you have chosen to use will determine the cost.  The average cost is currently about $500.  This is NOT optional and you generally have to pay for it within the first 10-15 days after you negotiate your contract.

  •  Inspection Costs - Once you have an agreed upon and bound contract, you automatically enter the Inspection Period.  As a buyer, you are entitled to complete any and all inspections that you feel are necessary to continue on the purchase of your home.  These inspections are optional and you will be paying for them out of pocket.
    • Home Inspection - During this inspection, a state licensed home inspector will thoroughly check the inside, outside, underneath, and top of your home.  They are making sure the electrical, plumbing, roof, HVAC unit, appliances, etc are in working order.  These professionals are licensed home inspectors, so keep in mind, for example, if several electrical outlets are reading incorrectly, the inspector will notate this on their report and recommend having a licensed electrician investigate further.  The home inspection report given to you should be a thorough report of all of the inspector's findings and can easily be several pages long; even if there aren't many issues.  There is no set fee for home inspections.  Depending on the build, size, and age of your home, the inspector will set his own fee.  These generally start at $250 and need to be paid prior to the inspection.
    • Wood Destroying Insect (Termite) Inspection - These have recently become optional for most loan programs, but its still a good idea to have completed.  A licensed pest control specialist will inspect the home for any historical or current evidence of termites. These inspection reports costs about $40-60 and they can generally be paid for at closing.  If evidence is found during the inspection, you will not receive a "clean" termite letter, and can usually negotiate with the seller to have a treatment done before closing.  (Even though these are currently optional, if an appraiser recommends an inspection and/or treatment, they are no longer optional and must be completed.)

  • Utilities - Yes, having your electricity, water, and sewer turned on in your name can come with a fee too.  All utility companies are different and its a good idea to find out which companies service your home early into the buying process.


Buying a home can be stressful, but by being prepared and working with a great lender and Realtor®, you will be quickly on your way to owning a new home and soaking up all of the benefits of home ownership.

TN License #324769 - Office License #255083
865-599-8780 direct/text, 865-579-3868 office
cmoodyhomes@live.com

Follow me on Facebook or on Twitter!

Monday, October 12, 2015

Fall Pumpkin Wreath

I don't consider myself a very creative person.  I see all of these ideas on Pinterest, Facebook, and youtube, and I think "Yes, I can do that."  Then I quickly talk myself out of it.  However, I have become very interested in wreaths.  I have made a couple burlap wreaths that I left plain and have given to family members.  They decorate them with each season change.

This is Mom's Halloween wreath from last year.

This year, I decided I wanted a big ole' wreath for my front door.  So I got online!  Do I buy one that was already made?  Do I watch 15,000 tutorials and see if its something I can make?  So I finally decided to make a Pumpkin Wreath.  I figured, if it came out looking decent, that it would work for the Fall season and Halloween.  (I've already got my ideas together for a Christmas wreath.)


Here is my Pumpkin Wreath Tutorial

Your Materials:


2 - 21" x 10 yards deco mesh rolls - I used an Orange and Orange with Copper Foil 
1 - Roll of green ribbon - I used Wired Faux Burlap Moss Green Ribbon, 2.5" x 10 yards
1 - 24" work wreath frame in Orange
1 - Pair of sharp scissors 

Let's get started!

For the "pumpkin" part of the wreath -

Take your deco mesh rolls and cut them in strips about 10"-12" wide.  I did not measure these, just eye balled it.  Once you cut the deco mesh, its going to want to roll back up - that's fine - and if both sides are touching, you've cut a large enough length.  Keep cutting until you have gone through both rolls of the deco mesh.


Eventually, your work station is going to look like this - 


Once everything is cut, get your wreath frame and start spreading the prongs out.


Remember, it doesn't matter where you start or what colors you start with.  Choose your first color and roll it up - in the same direction that the deco mesh is already wanting to roll, just a little tighter.  Don't do a tight roll, but it should be about the same circumference as a toilet paper or paper towel roll.

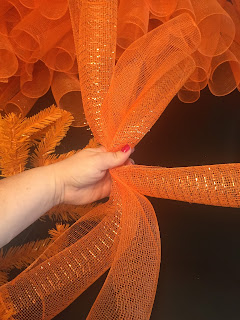
For me, I started with the orange with foil - rolled an orange with foil, rolled one solid orange, and a second orange with foil.  Once you have 3 rolls, pinch them together in the center, place them in your prongs, and twist the prongs together one time.


Now alternate for 3 more rolls.  In my case, I would roll 2 solid orange and 1 orange with foil.


Keep alternating until you have filled all top and bottom prongs.   You may have some deco mesh left over.  Once you have filled in all of your prongs, you are going to have a full wreath with the possibility of some bare areas.  Just move the deco mesh circles around until you have filled everything in to your tastes.  


For the "stem" part of the wreath - 


Take your green ribbon and unspool enough to make 2 loops out of 1 piece of ribbon.  Again, I did not measure anything, just eye balled to make the loops as big as I wanted them.  


Once you have the length you prefer, you need to cut 4 pieces of ribbon.


Line all 4 pieces together and pinch them in the middle.  You are going to use this point to secure all 4 ribbons in one of the top prongs on our wreath.


With the ribbons secure and hanging down, take 3 of the ribbons and loop them back to the top of your wreath prong.  This is going to create your pumpkin stems and you will have a ribbon (1 hanging down each side) that will make the rest of your pumpkin vine.


If something doesn't look right to you, remember you can always rearrange and adjust.


Here is my finished product hanging on the front door!


Thank you for taking the time to read this and I hope this gets the creative juices flowing for some of you.  Remember you do NOT have to be a creative genius to make something awesome for your home or front door.  


TN License #324769, Office License #255219
865-599-8780 direct/text, 865-688-3232 office
cmoodyhomes@live.com


PS - I have to thank Kitty for her support in this project.